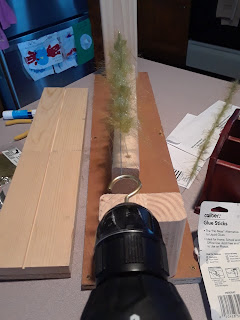
A while back I posted about making dubbing brushes and dubbing brush machines. You can click here to view the post if you didn't get a chance to read it and need to get caught up. I've been interested in tying with brushes for a while, but not willing to pay the high cost that comes along with them. At this point, I might be getting ahead of myself so let me explain what a brush is in terms of fly tying. A dubbing brush is actually a piece of wire that is impregnated with different materials. I've seen EP fibers, rubber legs, bucktail, and ice dub in brushes. Below is a picture in case you need a better reference that what I have described.
As you can see, dubbing brushes come in all shapes and colors. They can be used for tying small nymphs or big, nasty streamers. I intend to use my brushes for big streamers because I have struggled to tie with synthetic materials in the past and like the ease and consistency of using a brush.
Also, it is noteworthy (not that you're taking notes, but if you are, good for you and way to be studious), that I really enjoy engineering and woodworking. I'm not good at either but I like to problem solve and work with my hands. That too drove to to experiment and ultimately build a dubbing brush maker. With that being said, guys, anyone can do this...and probably a lot better than me! And for what it is worth, this was just a prototype build. It wasn't designed to be anything fancy that didn't take up much time or money. I didn't want to invest much of either if I didn't like using dubbing brushes.
The base is made of plywood with a veneer wood that I attached on top. The ends are 2 X 4's and the surface where the wire and materials are placed is just a 3/4 inch board with a groove cut into it. I used a table saw to cut the groove. I also bought some 32 gauge beading wire from Hobby Lobby to use as the wire for my brush. I stole this idea from a video that Brian Wise made and so far it has worked wonderfully. I attached one end of the wire to a hook that I attached to the frame. I attached a second hook to the chuck of a cordless drill rather than twisting the wire by hand or with a crank.
After completing the frame and work surface, I decided to make 3 brushes. Two of them contained olive craft fur and ice dub for flash. The other had some olive, orange, and yellow EP fibers. Here's what I learned from my first three brushes and hopefully it can prove helpful to you.
1. I need to brush the material more while I'm spinning it. I need to take breaks and comb out the fibers so they don't get gummed up in the process.
2. The anchor point is great and each time the wire broke, it either broke at the drill or on the fixed hook on the frame.
3. Sometimes it is better to go with a lot of material while others, less is more and looks better. I guess it just depends on how big and nasty you want to make your flies.
4. As the wire twists, the brush naturally gets shorter. I noticed that the entire machine was getting pulled towards the drill but as long as I allowed this to happen, I think I got more twists in the brush and a stronger brush with a thinner diameter as a result. I think this thinner diameter will be advantageous when I start tying these brushes to hooks.
In closing, this was a really fun project and I can't wait to start tying with my homemade brushes. I will whip up a few flies and show them to you in the future. After some experimentation, I'll decide whether this is a technique I want to continue using and whether a better dubbing machine is in order. Stay tuned because I will be sure to have a follow up post, hopefully next week.


No comments:
Post a Comment