I recently posted about carp fishing and the fact that a friend of mine has a pond that has an abundant population of the suckers (see what I did there). As Paul Harvey would say, “And now for the rest of the story.” The carp that I have enjoyed pursuing all summer aren’t supposed to be there. He originally stocked the pond with bluegill, catfish, and bass but a creek that runs near his house flooded and introduced common carp as well the notorious and problematic bighead carp. He believes that either one of these species or both of these fish are responsible for churning up the water so much that the water is always incredibly murky and creating a difficult environment for the other fish to thrive. With that in mind, he has decided that all of the carp need to be eliminated. He is reluctant to poison the entire lake because he doesn’t want to start from scratch and kill ALL the fish. Instead, he has enlisted me and a buddy of mine to try and thin out the population.
Now I am usually a catch and release fishermen unless a
neighbor, friend, or property owner wants me to keep a few fish for the
occasional dinner so it does pang me to kill a fish without it feeding
someone. However, if you think about it,
nothing in nature ever really goes to waste.
The carp we have caught and left on the bank have probably fed a host of
raccoons, opossums, and other scavengers.
Nature is an exponentially better recycler than mankind could ever dream
to be so that is what helps keep me from losing sleep at night.
So not only do my buddy and I have a large population of
carp to fish for, there is another benefit that can be found in this experience
as well however. I recently read in The Total Fishing Manual by Field and Stream
and at http://hbng84.hubpages.com/hub/FishTailMount
that you can mount a fish’s tail for a very small amount of energy and
money…but it will cost you some time (about 3-4 weeks but it is mostly waiting). I have successfully mounted six tails that
have come from a rainbow trout my son caught (yes, we ate that one), a bighead
carp that I snagged, and four common carp.
The tails are very clean, neat, and unique when they are complete and serve
as a lasting memory of your catch. They
also save you about $400 since you don’t have to go to a taxidermist and they take
up a fraction of the space. Call it a
trophy, an homage, or small piece of history but in my opinion a tail mount
looks cool and is valuable because you put in all the work from beginning to
end. While the book and the website all
give some suggestions on how to mount the tail of a fish, I realized that I had
to fill in some gaps and blend the ideas/suggestions of both resources. I would like to pass on a step by step set of
instructions that have worked for me
when mounting a fish tail.
Step 1- cut off the tail
Step 2- cut the spine and clean out the cavity. I use a filet knife and wire snips. (No picture available).
Step 3- pack the cavity with borax, lay on plywood
covered in borax, and finally cover the top with borax.
Step 4- 1 week later, empty the cavity and fill with
great stuff expanding foam. Place back
in borax and make sure both top and bottom of tail are covered in borax.
Step 5- if the tail is completely dry and almost scent
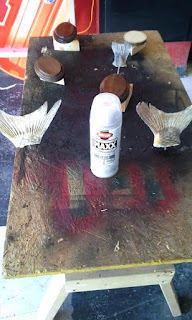
free, trim the expanding foam and get ready to spray with gloss. You can see that the foam was trimmed in the second picture to make sure it will fit flush with the base of the mount.
Step 6- spray the tail and mounting base with 4-5 coats
of gloss.
Step 7- drill a hole in the middle of the base and put a
screw/nail through the hole. The foam of
the tail will be placed so that the screw/nail is inserted into the foam.
Step 8- using 2 or 5 minute epoxy, attach the tail to the
base. You get one shot at this so make
sure it looks just the way you want. You can see where the epoxy has been applied to the base of the tail in the second picture.
Step 9- after the epoxy has dried, use a decorative rope
or cord to encompass the base so that the bottom of the tail and the visible
expanding foam cannot be seen. Staple
the rope or cord to the base in what will be the back of the mount. The top picture is the rope that I like to use and bottom two pictures are finished products.


No comments:
Post a Comment